You are in:

Fuel
System |

General
Maintenance - Fuel System
| The fuel system consists of a petrol
tank, a mechanical fuel pump operated from the
engine camshaft, and a carburettor of the
downdraught type with the necessary fuel
connecting lines. A fuel tank is located
either:
- at the rear
of the car beneath the luggage
compartment (Saloon and Estate)
- at the rear
of the vehicle on the left hand side
(Van)
The
quantity of fuel in the tank is registered on the
fuel gauge when the ignition is switch
“on”. The gauge is designed to
eliminate needle fluctuation whilst the ignition
is switch on.
The
fuel tank filler is located :
- to the right
of the rear number plate (Saloon and
Estate)
- to the rear
of the van on the on the left hand side
(Van)
The
filler cap may be easily removed by turning it in
an anti clockwise direction. Make sure that the
filler cap is replaced securely and see that the
vent hole is clear of obstructions at all times,
otherwise failure of the fuel supply to the
carburettor may result.
The engine is
designed to operate on premium grade fuel. An
optional low compression cylinder head is
available should it be necessary to use low grade
fuel.
|
Fuel
Pump
This is mounted on the right hand side of the
cylinder block, is entirely automatic in action.
It requires little attention other than cleaning
the filter screen regularly and removal of
sediment from the pump chamber. The fuel pump can
be one of two types. One type had a domed metal
cover and the other an inverted glass sediment
bowl. |
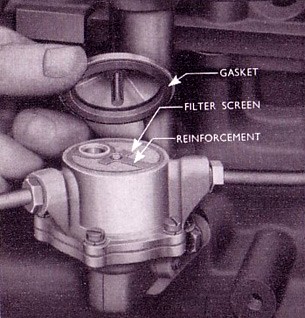
| Clean the Fuel Pump
- (5000 Mile Service) Domed
Cover Type
To service the domed cover type, remove the screw
from the top of the pump and detach the cover and
filter screen. Clean any sediment from the pump
body. Clean the screen in petrol and replace it
on the fuel pump body with the reinforcement
upwards. Check the gaskets to ensure that they
are in good condition and will make an airtight
joint. Renew the gaskets if necessary. Refit the
domed lid and tighten the screw.
|
 |
Glass Sediment Bowl Type
To service the glass sediment bowl type pump,
slacken the clamp nut at the top of the pump and
remove he bowl and filter screen. Clean any
sediment from the pump body. Clean the screen in
petrol and replace it on the fuel pump body with
the reinforcement upwards. Check the gasket to
ensure that it is in good condition and will make
an airtight joint. Renew the gasket if necessary.Replace the glass sediment
bowl and tighten the clamp nut
|
 |
Checking
Fuel Supply to the Carburettor
If insufficient petrol is reaching the
carburettor, the following points should be
checked:Check that there is sufficient fuel
in the petrol tank.
Check that the filter screen and fuel pump have
not become fouled with sediment.
Check that there is no air leak at any point in
the fuel line connections, which would result in
air being drawn into the system, so that the pump
will not prime.
A comparatively simple test
for fuel delivery can be carried out by
disconnecting the fuel feed pipe to the
carburettor, when a distinct spurt of petrol
should be evident for every two revolutions of
the engine.
Warning –
Petrol is highly flammable. Please ensure you
take suitable precautions if following
Ford’s 50 year old advice.
|
 |
The Carburettor
(fitted prior to May 1962 Type A)
The carburettor is of a downdraft type and
incorporates a special two-stage starting device
on the left hand side of the carburettor body.All adjustments are made at
the time of manufacture and, with the exception
of the idling adjustment, will remain permanently
correct unless disturbed. The idling adjustment
should be checked after the car has been
“run in”.
All petrol jets are
accessible from the outside of the carburettor
and they should be removed and cleaned
periodically. Obstructions should be cleared by
blowing through the jets and passages with a tyre
pump.
On no account use wire or
anything else which could enlarge the jet
orifices, as the jets are calibrated to very fine
limits and not only economy, but general engine
performance can be upset by enlarging the jets in
this manner.
The special
two-stage starting device on the side of the main
body must be used with care, as it is designed to
provide a very rich mixture for cold starting,
when the choke control is pulled right out. Great
care must therefore be taken to follow the
correct starting instructions, otherwise excess
petrol will pass into the engine and may cause
premature engine wear.
|
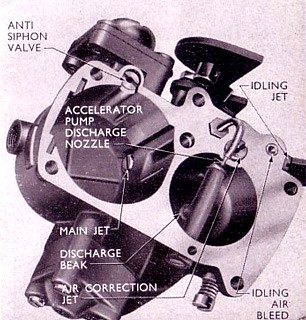 |
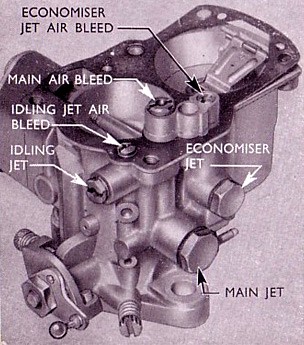
The Carburettor with
Accelerator Pump
(fitted after May 1962 Type B)
The carburettor is of a downdraft type and
incorporates an accelerator pump, an economy
device controlled by manifold depression and a
choke valve of the semi-automatic strangler type
with a friction locking choke control.All adjustments are made at
the time of manufacture and, with the exception
of the idling adjustment, will remain permanently
correct unless disturbed. The idling adjustment
should be checked after the car has been
“run in”.
The air cleaner used with this
carburettor is of the wire gauze type, except on
certain models where a paper element cleaner is
fitted.
Note - On no
account “pump” the accelerator pedal
when starting the engine.
|
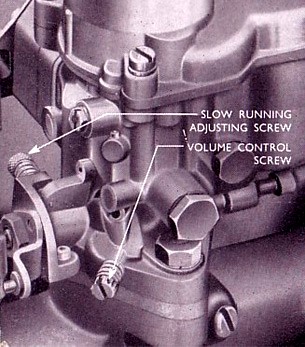 |
Carburettor Adjustment
- (5000 Mile Service)
The only adjustments required are to the volume
control screw and the slow running adjustment
screw.Idling adjustment must be
carried out when the engine is hot as follow:-
Screw in the slow running adjustment screw until
the idling speed is a little faster than normal.
Unscrew the volume control screw until the engine
begins to “hunt”
Screw the volume control screw in again until the
engine runs evenly. If the engine speed is then
too high, unscrew the slow running screw until a
reasonably slow idling speed is obtained. This
may cause a slight resumption of
“hunting”.
If so screw in the volume control screw until the
idling is perfect.
Note that the volume control screw
alters the volume of mixture passing into the
engine. Screwing it in reduces the volume of
mixture and screwing it out increases the volume.
It may also be necessary to make an
alteration to the distributor timing, in order to
obtain satisfactory idling.
Do not expect a
new engine to idle perfectly at low speeds until
various machined surfaces have had a chance to
“run themselves in”.
|
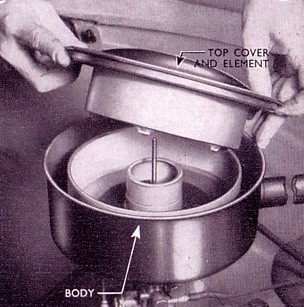
Clean
the Air Cleaner - (5000 Mile Service)
This is fitted
on the top of the carburettor and can be of two
types. This can be either a dry gauze type or an
oil bath type and normally requires servicing
every 5000 miles (8000 km). Should you be
operating your vehicle in a heavily dust-laden
atmosphere, more frequent servicing to the air
cleaner is recommended. The effect of allowing
the internal filter element to become choked with
duct etc, will be to restrict the air supply, in
turn enriching the mixture. Failure to clean this
filter element properly at the correct time can
adversely affect performance and fuel economy. |
Oil Bath Type Air Cleaner
To clean, remove the air cleaner, unscrew the
wing nut on the top cover and lift off the cover
and the cleaner element. Empty the oil and
thoroughly clean the body. Wash the air cleaner
element in petrol to remove the dust and dirt,
and refill the air cleaner body with fresh engine
oil up to the level of the arrow stamped on the
side. Check that the cork gaskets are in good
condition, refit the element and the cover. Refit
the air cleaner to the carburettor. |
 |
Dry Gauze Type Air Cleaner
To clean, remove the air cleaner by slackening
the clamp securing it to the carburettor. Pour a
small amount of petrol into the cleaner via a
larger diameter aperture (where the carburettor
connection hose is fitted), swill round and pour
out of the “spout”. This procedure
should always be adopted, otherwise the tendency
will be to wash the dirt in the cleaner further
into the gauze. The element should be lightly
oiled, adopting the same procedure, any surplus
oil being allowed to drain off. Refit the air
cleaner to the carburettor. |
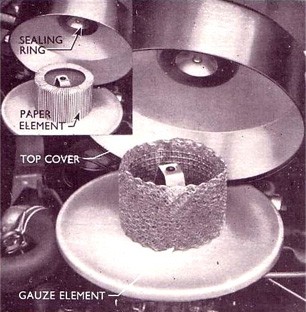 |
Paper
Element Type Air Cleaner
This is very similar to the wet type of air
cleaner, but instead of having a gauze element it
has a special paper one. This paper element must
not be washed or oiled. Stand the element
vertically and tap it on a firm flat surface
while slowly rotating it. Check the element for
tears in the paper or signs that it is so clogged
that the tapping treatment will not clear it.
Renew the element if it is defective. |
Information taken from Various Ford
Anglia Instruction Books and Handbooks..
Warning -
The Health and Safety bit.
Please note your health may be at
risk if you do not take sensible safety
precautions. Never work under an unsupported
vehicle, do not take shortcuts. If you feel that
the task is beyond your capabilities, then employ
the services of a trained professional. The Owner
of this Website nor the author cannot be held
responsible for any accidents or injury arising
from advice given on this webpage. Safety advice
can be obtained from the RoSPA.
|

|
|

